
Setting Up Trunking With Patriotwaves Dual TCXO SDR Radios
Download the latest version here
Version: UniTrunker-2.1.0.108
2. You will need to have installed the HDSDR. DSDPlus and Virtual Cable from our directions on the website here.
3.Install Unitrunker – It will install automatically in your PROGRAM FILES folder or PROGRAM FILE (x86) folder if you have a 64 bit operating system.
4.Once installed, navigate to that Unitrunker folder and find the UNIFORM application file and make a shortcut to your desktop.
5.Right click the shortcut icon and select properties. Select the COMPATIBILITY tab and check “run this program as administrator” then hit apply and close.
6.PLUG IN YOUR RADIO. Start the program and select “first time installation?
7.When the windows opens look for the “+” (add receiver) icon.
8.Select the RTL2832U and another box will open. Enlarge the screen of the window.
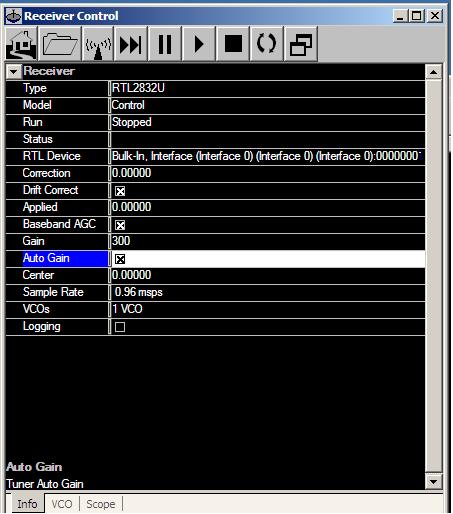
9.Select the INFO tab at the bottom and follow this window picture for settings
10. SETTINGS
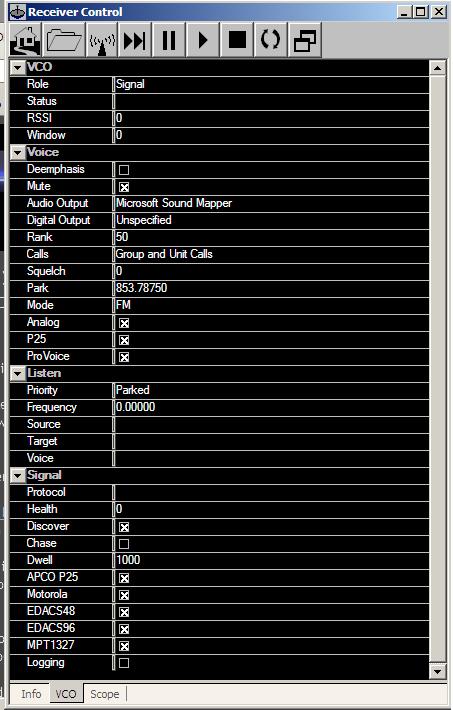
Change the settings as indicated above and then select the VCO tab at the bottom
Follow these settings. Your RTL device will be the first listed of the two radios which is usually represented as RTL with a series of 0’s ending with a 1.
Find the control channel for your system and put it into the PARK box. After this reduce the window and add “+” the next device RTL2832U.
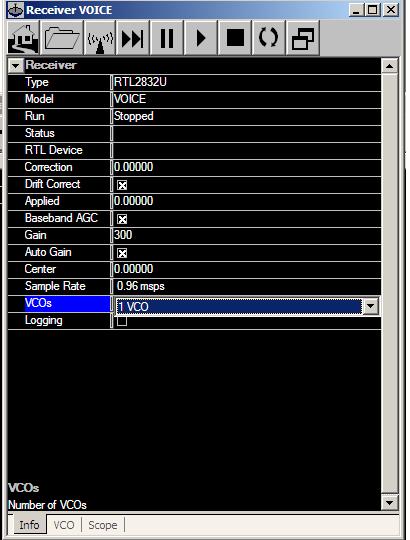
This is your voice chasing radio. Follow the setting here and after completion select the VCO tab. Please note you will select the second RADIO under the RTL DEVICE. This is usually shown as a number and then “&” and a series of letters and numbers. It is not shown in the picture
Follow the setting for your voice radio as shown and then reduce this window back to the smaller size as you did the CONTROL radio.
You will set the Virtual Cable for this radio and you will need DSDPlus installed and ready to go. Start the DSDPlus program and make sure your default settings are as follows;
Four boxes will open and you will look at the big black DOS command screen. You will find the default devices on this screen.
audio input device #? (VB-Audio Point) initialized
audio output device #? (Speakers or Sound device) initialized
If not as shown you will have to change computer sound settings to reflect this recording and playback device. You can also write a batch file to set these defaults as explained on our website instructions.
Once you have DSDPlus activated and correct you will start the two TCXO radios. This is found at the top of each device. Select the SCOPE tabs for both radios and start. If set up correctly you will see the CONTROL scope running and the VOICE radio as a straight line until a voice transmission is initiated. Look for the CONTROL radio to activate a new box which will appear and start populating the channels. Control channels in RED, alternate control channels in YELLOW and VOICE channels in WHITE. Any voice channel transmitting will turn from WHITE to GREEN and the ID, Source and TARGET is displayed on both Unitrunker and the activity window of DSDPlus. You can then size the windows for your best performance and viewing.
Refer to www.radioreference.com for ALL TRUNKED SYSTEMS in your county and local area. Contact us for troubleshooting and support if you need.
Go to the contact page for information
